Introduction
Gel nail polish has become a popular choice for those seeking long-lasting, glossy nails. Its durability and chip-resistant properties make it an attractive option for manicures, but when it’s time to remove it, many people are unsure of the best and safest method. How to remove gel nail polish correctly is essential to avoid damaging your natural nails and ensuring that they remain healthy.
In this article, we’ll provide you with a comprehensive, step-by-step guide on how to remove gel nail polish at home safely. From the tools you need to the best techniques for removal, we’ll cover everything you need to know to ensure that your nails stay in great condition.
Why Proper Gel Nail Polish Removal is Important
While gel nail polish provides a beautiful finish and long-lasting wear, improper removal can lead to nail damage, including thinning, peeling, or even breakage. It’s essential to remove gel nails properly to avoid harming your natural nails and to keep them healthy for your next manicure.
Here are a few reasons why proper gel nail polish removal is critical:
-
Prevents Nail Damage: Harsh removal methods, such as peeling or scraping, can cause your natural nails to become weak or damaged.
-
Maintains Nail Health: By using safe removal methods, you can avoid causing trauma to the nail bed and ensure your nails stay in top condition.
-
Preserves Nail Strength: Incorrect removal can lead to thin or fragile nails, making it harder to apply gel polish in the future.
-
Prevents Infections: Avoiding improper removal reduces the risk of introducing bacteria into the nail bed, which can cause infections.
By following the right steps, you can keep your nails looking great and healthy after removing your gel polish.
Tools You’ll Need to Remove Gel Nail Polish
Before you begin, it’s essential to gather the right tools. Using the proper equipment ensures a smooth and safe gel polish removal process. Here’s what you’ll need:
Nail File
A gentle nail file is used to lightly buff the surface of the gel polish to break the seal and allow the remover to penetrate more effectively. Be careful not to file too aggressively, as this can damage your natural nail.
Acetone or Gel Nail Polish Remover
Acetone is the most common and effective solution for removing gel nail polish. You can also use a specially formulated gel polish remover, but ensure that it’s acetone-based for the best results.
Cotton Balls or Pads
Cotton balls or pads are essential for applying the acetone to your nails. Make sure you use enough cotton to cover the entire nail surface.
Aluminum Foil
Aluminum foil is used to wrap the cotton pads soaked in acetone around your nails. This helps keep the acetone in contact with the gel polish for a longer period, which allows the polish to break down more effectively.
Cuticle Pusher or Wooden Stick
After the gel has softened, use a cuticle pusher or a wooden stick to gently lift the gel off the nail. This step requires patience and gentleness to avoid damaging the natural nail.
Nail Buffer and Cuticle Oil
A nail buffer is useful for smoothing the nail surface after the gel is removed. Applying cuticle oil will help hydrate your nails and cuticles after the removal process.
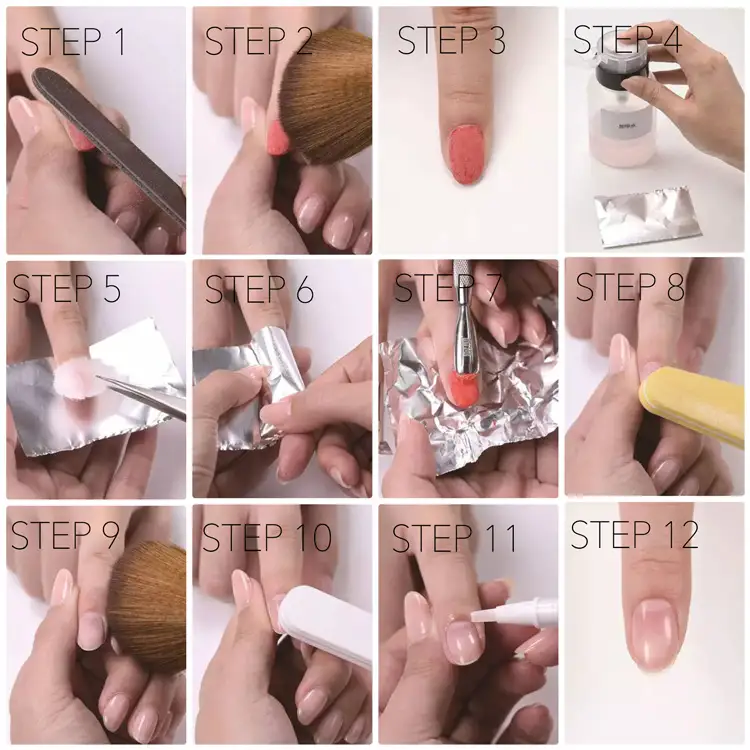
Step-by-Step Guide on How to Remove Gel Nail Polish
Now that you have the tools ready, let’s dive into the detailed, step-by-step process of removing gel nail polish safely at home.
Step 1: File the Top Layer of the Gel Polish
The first step in removing gel polish is to file the top layer of the polish. This helps break the seal and allows the acetone to penetrate the gel more effectively.
-
Use a gentle nail file with a fine grit to file the surface of the gel polish. Avoid filing too much to prevent damage to your natural nail.
-
Focus on the shiny surface of the gel nail, but don’t go too deep. You want to create a rough surface, not file the nail itself.
Step 2: Soak Cotton Balls or Pads in Acetone
Next, soak cotton balls or pads in acetone or gel nail polish remover. You’ll want to saturate the cotton pads completely to ensure that they have enough remover to break down the gel polish effectively.
-
If you don’t have cotton pads, you can use small pieces of cotton balls or even makeup pads.
-
Gently wring out any excess acetone to avoid dripping.
Step 3: Apply the Acetone-Soaked Cotton to Your Nails
Once the cotton pads are soaked, place one over each nail. The cotton should completely cover the surface of the gel nail. This step is crucial as it ensures the acetone is in direct contact with the gel polish.
-
Press the cotton pad gently onto each nail.
-
If you have long nails or the gel is stubborn, you can wrap the cotton with aluminum foil to secure it in place. Wrap each finger with a small piece of foil, securing the cotton pad tightly against the nail.
Step 4: Wait and Let the Acetone Work
Now, let the acetone sit on your nails for 10 to 15 minutes. During this time, the acetone will soften the gel polish, making it easier to remove.
-
While waiting, you can relax or perform other tasks, but avoid touching the cotton pads to ensure they stay in place.
-
The amount of time it takes for the acetone to work may vary depending on the thickness of the gel polish. If the gel isn’t fully dissolved after 15 minutes, you can let it sit for an additional 5-10 minutes.
Step 5: Gently Remove the Gel Polish
After the waiting period, it’s time to remove the cotton pads and foil. The gel polish should have softened significantly by now, making it easier to remove.
-
Use a cuticle pusher or a wooden stick to gently push off the gel polish from your nails. Start at the edge and carefully lift the polish away from the nail.
-
If the gel doesn’t come off easily, avoid scraping too hard. You can soak the cotton pads and foil for a few more minutes and try again.
Step 6: Buff and Smooth the Nails
Once the majority of the gel polish is removed, use a nail buffer to smooth the surface of your nails. This helps remove any remaining residue and gives your nails a clean, smooth finish.
-
Buff gently to avoid damaging the nail surface.
-
If you notice any rough patches or remaining gel, carefully repeat the soaking and removal process.
Step 7: Moisturize Your Nails and Cuticles
After the gel polish is completely removed, your nails may feel dry or brittle due to the acetone. It’s important to moisturize and hydrate your nails and cuticles to restore their health.
-
Apply cuticle oil to your nails and massage it in gently. This will help replenish moisture and nourish your nails.
-
You can also apply hand cream to further hydrate your skin and cuticles.
Tips for Safe Gel Nail Polish Removal
Here are some helpful tips to ensure you remove gel nail polish safely and protect your natural nails:
Don’t Rush the Process
It may be tempting to try and remove gel polish quickly, but rushing the process can lead to nail damage. Be patient and allow the acetone to work its magic. Rushing through the removal can cause peeling or lifting of your natural nails.
Avoid Peeling the Gel Off
Peeling the gel off your nails is one of the most common mistakes people make. This can cause your natural nail to tear or become weak. Always use acetone and gentle scraping techniques to remove the gel polish.
Give Your Nails Time to Recover
After removing gel polish, give your nails a break before applying new polish. This allows your nails to breathe and recover. If you use gel polish frequently, take breaks between applications to avoid weakening your nails.
Moisturize Regularly
To keep your nails healthy, make moisturizing a regular part of your routine. Use cuticle oil daily and apply a nourishing hand cream to keep your nails hydrated.
When to Seek Professional Help
If you’re unsure about removing gel nail polish on your own or if you experience any discomfort, it’s always a good idea to visit a professional nail technician. If your nails are damaged or the gel polish is particularly stubborn, a professional can safely remove it without causing harm.
Conclusion
Knowing how to remove gel nail polish correctly is essential for maintaining the health of your nails and ensuring that your next manicure looks its best. With the right tools, techniques, and patience, you can safely remove gel polish at home without causing damage. Remember to moisturize your nails afterward and give them a break to allow them to recover. By following these steps, you can keep your nails strong, healthy, and ready for your next fabulous gel manicure.


