Introduction to ssh-keygen
When it comes to securing your online communications, SSH (Secure Shell) has become the go-to protocol for many. At the heart of this security lies a powerful tool called ssh-keygen. If you’ve ever needed to connect to a remote server or manage your Git repositories securely, chances are you’ve encountered it. But what exactly is ssh-keygen, and why should you care? Whether you’re a seasoned developer or just starting out, understanding how to generate and manage SSH keys can significantly enhance your digital security. Let’s dive into the world of ssh-keygen and unlock its potential together!
Understanding SSH Keys
SSH keys play a crucial role in securing remote connections. They consist of a pair: a public key and a private key.
The public key is shared with the server, while the private key remains on your device. This asymmetric encryption adds an extra layer of security compared to traditional password authentication.
When you attempt to connect to a server, the SSH protocol uses these keys for verification. The server checks if your provided public key matches its records linked to your account.
Using SSH keys eliminates many risks associated with passwords, like brute-force attacks or phishing attempts. It’s also more convenient since users can connect without needing to enter their passphrase every time—provided they have set up an SSH agent.
Understanding how these components interact is vital for maintaining secure access in today’s digital landscape.
Generating an SSH Key Pair with ssh-keygen
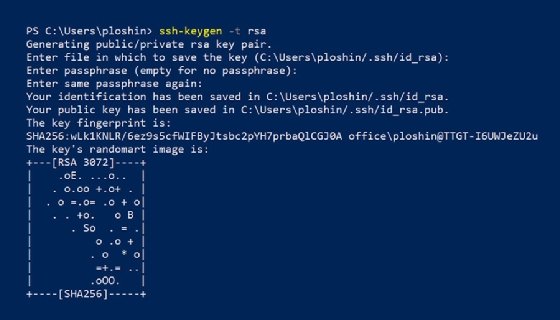
Generating an SSH key pair with ssh-keygen is a straightforward process. Begin by opening your terminal. This tool comes pre-installed on most Unix-based systems, including Linux and macOS.
Type the command `ssh-keygen` and hit Enter. You’ll be prompted to select a file location for the keys. The default path is usually fine, so just press Enter unless you have specific needs.
Next, you can add an optional passphrase for added security. This adds another level of protection if someone gains access to your private key.
After this step, two files will be created: one public (.pub) and one private key without an extension. Keep your private key safe; it should never be shared or exposed publicly. Your public key can be distributed as needed for secure connections.
Storing Your SSH Key and Configuring Permissions
Once you’ve generated your SSH key pair, the next step is storing it securely. Typically, SSH keys are saved in the `~/.ssh` directory on your local machine. This hidden folder is where all your keys and configuration files reside.
Setting proper permissions for your keys is essential to maintain security. The private key should only be accessible by you. To achieve this, use the command `chmod 600 ~/.ssh/id_rsa`. This restricts access so that only the file owner can read or write it.
Your public key can be shared freely without concerns about security. However, always ensure that it’s paired with its corresponding private key when configuring servers or services requiring authentication.
Regularly reviewing and managing these keys helps prevent unauthorized access to sensitive systems. Keeping everything organized will save you time and hassle later on.
Using Your SSH Key for Authentication
Once you have your SSH key pair ready, using it for authentication is straightforward. First, ensure that the public key is added to the remote server’s authorized keys file. This file typically resides in the `.ssh` directory of your user account on the server.
When connecting via SSH, simply specify your private key with the `-i` option. For instance:
“`bash
ssh -i ~/.ssh/id_rsa username@hostname
“`
If you’ve set everything correctly, you won’t be prompted for a password. Instead, your device uses cryptography to verify its identity against the stored public key.
Should you encounter issues during this process, check permissions on both local and remote files. The `.ssh` folder should be secure; generally, it requires permissions set to 700 for directories and 600 for files within them.
This method enhances security by eliminating password vulnerabilities while simplifying access management across multiple servers or services.
Common Issues and Troubleshooting Tips
When using ssh-keygen, you might encounter some common issues. One frequent problem is permissions errors. Ensure your private key file has the correct permissions set to prevent unauthorized access. The command `chmod 600 ~/.ssh/id_rsa` can help with this.
Another issue could stem from mismatched keys on the server and client side. Double-check that you’ve added your public key to the authorized_keys file on the remote server correctly.
If you receive a “Permission denied” message during connection attempts, verify that you’re trying to log in with the right user account associated with your SSH key.
Sometimes, wrong configurations in the SSH config file can lead to connection problems as well. Review entries for accuracy and ensure no conflicting settings exist.
If everything seems fine but it still doesn’t work, restarting your SSH service may resolve unexplained glitches.
Conclusion
Using ssh-keygen is a powerful way to enhance your SSH security. By generating an SSH key pair, you create a robust method for authentication that eliminates the need for passwords. This not only streamlines access but also reduces vulnerabilities associated with traditional password logins.
Understanding how to manage and store these keys properly is crucial. Proper permissions and storage help safeguard your sensitive information from unauthorized access. With this knowledge, you’re better equipped to navigate common issues that may arise during usage.
As technology evolves, staying informed about best practices in security remains essential. Embracing tools like ssh-keygen empowers users with stronger protection mechanisms while simplifying their computing experience. Adopting these methods can significantly improve both security and efficiency in accessing remote systems.